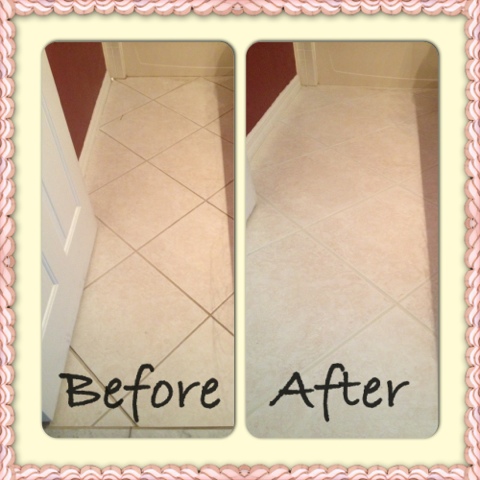
Okay! As I was surfing Pinterest the other day I came across a blurb about cleaning grout. For the Floridians here that have a lot if tile it seems like there is a constant battle of keeping our grout clean. I have been known to either let it go( which doesn't make me or the hubby happy), pay a lot of money to clean it ( and be dirty from two kids and two dogs a day later), or be on my hands and knees for a week scrubbing to be dirty again by the time I finish an area! Well, after checking out many reviews I decided to try this stuff called Polyblend Grout Renew. I found it at my local Home Depot and it comes in many colors. For mine I tried Antique White. I'll be honest... When I started it was such a drastic change it looked like I was just painting over it, but as I finished, it looked amazing! It was like a brand new floor! Here are some pictures of the process. See for yourself and I quote my daughters reaction.."so when are you going to do the rest of the house?!?"
Here is a video to show how I applied it....


It is not two years later, how did it hold up? I am looking at doing this in our kitchen!
ReplyDeleteHi Kayla- somehow I missed your comment! It has indeed been two years and I'm glad I did it. Dirt still builds up in the grout, but it's so much easier to clean than before. It also has helped with spills in the kitchen and doggie mishaps. I just simply wipe them up and my grout doesn't stain like it did. It acts like a sealant...I'm curious. Did you try it,too? Let me know if you did what you thought. 😀
Deletedoes it stay white? thanks
ReplyDeleteIt gets dirt build up like normal, but it's so much easier to clean with less scrubbing. I'm so glad I did mine! It's a pain initially to do, but love it!
Delete